Saturday, October 05, 2013

Pencil Art Society - Excellence In Drawing Award

I am so excited!!  Two of my drawings, "Agnew Meadows" and  "Indiana Barn" have been accepted into the Pencil Art Society - PAS Online Juried Exhibition 2013.


In addition to this honor, my work "Indiana Barn"  was awarded the following prize:

EXCELLENCE IN DRAWING by Canson
$120 PRODUCT (SPONSORED By CANSON)


Saturday, June 29, 2013

The Blackwing Experience Event

When I told folks that I was attending a party for the Blackwing Pencil, I got some pretty strange looks.  But once I explained to them "what better place can a graphite artist have fun than at a pencil event?" They readily agreed this was "my kind of show".  The Blackwing Event was indeed a party for a pencil, but it was also so much more.  The Blackwing pencil can be considered a symbol of all things creative.  Whether you are an artist, writer, musician, architect, mathematician or engineer, a pencil and paper are the simplest tools to start releasing your creative muse.

Organizations like the Blackwing Foundation and the Creativity Center understand and promote efforts to give our youth opportunities explore creative avenues.   This is what the Blackwing Event was really all about. Each part of the event was carefully planned to spark and expose visitors to the creative process.

The Blackwing Experience Event was a 3-day (6/25-27) event held at the  Chuck Jones Center For Creativity located in beautiful Costa Mesa, California.

Here are a just a few of my photos documenting the event:


Chuck Jones was the creator and animator of popular cartoon characters such as Bugs Bunny, Daffy Duck, Wiley Coyote and the Road Runner. Chuck's drafting table and artworks were on display. 

Day camps were held for kids age 7-12.  Here is a photo of Stephen Reis, animator of the Simpsons, showing the kids how to draw Bart.
Various sketches and paintings of Chuck Jones animations are on display through out the center.


Tuesday evening's party launched the 3 day event.  A pencils.com store displayed many items sold on the website.  Of course, palomino and blackwing pencils were for sale as well as luxury sketchbooks.


Two of pencil.com featured artists Mike Theur and Diane Wright (me!) had artwork on display.  Here are snapshots of signage going up and the finished display.


A silent auction of several works of art was hosted to raise money for the Blackwing Foundation.  A framed Chuck Jones print with one of  his original blackwing pencils, a blackwing gift set box and a Diane Wright framed print were among the items auctioned.


The evening event was really a lot of fun.  Many of the displays were interactive exhibits, engaging the visitors to explore word and visual games.  These quickly "broke the ice" and everyone had a great time.  I met some of the nicest folks and the start of friendships that will last longer than my brief stay in California. I specifically want to mention 3 illustration artists that really made me feel welcomed,  Frank Howa, Mark Doublin, and Micheal Smith.  


Stephen Reis spent the evening sketching Simpson characters.


The pencil timeline (showing only a snippet here) covered on whole wall.  Lesli Scott, graphic designer, did an awesome job bringing the entire production to life!  Her personality glowed through her incredible work and displays.  


I want to thank Craig Kausen, President of Chuck Jones Center and (grandson of the famous animator) for the warm welcome and gracious host of the event.  I also want to thank his staff  as well as all the Pencils.com staff - Alex, Grant and the rest of the crew for the great job of putting this all together.

Lastly, I want to extend my heartfelt thanks to Charles and Ginger Berolzheimer.  Thank you for inviting me to participate.  It was delightful to finally meet you!  I hope to continue to collaborate with you and your team for many years to come as well as sharing our passion for creativity.

Here is a link to more photos and a summary of events:

BLACKWING EXPERIENCE OPENS WITH A “WHAT’S UP, DOC?”


Sunday, June 16, 2013

The Blackwing Experience - Exhibition

I am excited to announce that several of my framed artwork will be on exhibit at the upcoming Blackwing Experience  in Costa Mesa, California.  The exhibit will be held at the Chuck Jones Center For Creativity for the 3-day event June 25 through June 27th.


My original framed graphite drawing, Agnew Meadows, will be on display.  This drawing was featured as the vision for the next generation of fine artists in the Blackwing advertisement.  It is also the cover of the Blackwing Artist Series luxury sketchbook.

Over the past few years I have continued to collaborate with the Cal Cedar folks as one of their featured artists and submitting drawing technique articles to Studio 602.

With my artwork being on display and the event being held at the Center for Creativity; it is a venue I couldn't pass up.  I plan to be in attendance for the event Tuesday evening.  I am really looking forward to attending the ChuckTalk:.
  • ChuckTalk: a panel discussion on the evolution of the creative process featuring Charles Solomon, Jenny Lerew, Craig Kausen, Charles Berolzheimer and Christian Tamburr  (Wednesday, June 26th)
Los Angelas....here I come!

Wednesday, March 20, 2013

Article Six - Techniques to Help you "See"


Original article posted on Studio 602 - www.pencils.com

Drawing Lessons: Techniques to Help you “See”

Every artist has felt the frustration of getting “stuck” trying to draw the shape of an object.  By abstracting the object, you can disengage the thinking (left side of the brain) and tune into what you are actually seeing (the visual or right side of the brain).  In this section, we are going to practice techniques that can help you “draw” what you “see” and not what you think you see.

Contour Line  

There are a variety of contour line techniques.  Use one or any combination of these to help you see.
  • Blind Contour – draw the object without looking at your paper.
  • Pure Contour – draw the very outline of the object, drawing nothing on the inside.
  • Modified Contour – draw the outline and interior parts without shading.
  • Variable Contour – Vary the width of the contour line to give emphasis and weight to the line.  This creates an “expressive line” and provides depth to the object.
  • Cross Contour – draw lines that would follow across the form, like a topographical map.  This offers clues to identify 3-d form.  The brain needs very few clues to “think” its  3-d.

Gesture Drawing

Use quickly-applied marks to capture the energy and movement of the subject matter or capture the essence of a pose.   While gesture drawing is typically used in figure drawing, it can be used in still-life and landscapes as well.


Value Drawing 

Use only values to identify the shapes of the object, no lines please.


Negative Drawing

Focus your attention and draw the space around the object rather that the object itself (the gray space in the reference image)
  • Use a contour line draw only the area between the objects. (focus your attention on the space between the object.)
  • Use tonal drawing to identify the areas around the object.  Frequently used when rendering a light object against a dark background such as grass or trees.
Abstracting the object – The goal is to force your brain to see lines, shapes and spaces instead of the object as a whole. 
Two simple techniques:
  • Turn the image upside down
  • Look at the image in the mirror
Teach yourself to abstract the object and you can more accurately render the shape.  Disengaging the mind and focusing on the visual representation is your goal.  Ultimately….by abstracting, you can achieve realism.

Tuesday, March 12, 2013

Article Five - The Importance of Sketching


Drawing Lessons: The Importance of Sketching


Sketching is the fundamental building block for an artist.  It is used to develop a personal visual vocabulary.  Sketches are visual exercises in problem solving and provides the opportunity to:
  • hone your observational skills
  • exercise and develop mark-making skills
  • encourage selectivity
  • experiment with new techniques and expressive possibilities
  • create compositions and various lighting effects
Sometimes sketches are indecipherable to anyone but the artist, nothing more than scribbles.  Other times, they can become a finished artwork.  But most of the time, sketches are just snippets of thoughts or an impression of an idea.   For an artist, sketching is the most uninhibited and free-est form of the creative process.  Sketching is an art form in itself and gives insight into the artist’s soul.  While sketchbook journals are often shared, they can also be kept personal like a diary.


Creativity and Ideas

Ideas are usually fragile and last just fleeting moments.  They occur at anytime and unless written down or sketched, they can dissipate quickly.  Carrying a sketchbook and pencil allows the opportunity to capture these ideas.   Just a few words or a quick sketch is usually enough to capture the thought. Then at a later time, they can be explored, nurtured, and matured to their full artistic potential.

Wednesday, March 06, 2013

Article Four - Creating Textures


Repost from: pencils.com
Learn how to add texture to your drawings in this entry into Diane Wright’s drawing lessons series.

Drawing Lessons: Creating Textures

So what is texture?  We touch an object and can feel that it is smooth or rough, but how do we translate what we feel into what we see.  The type of surface and the amount of texture determines the amount of light that is reflected off the surface.
  • Hard surfaces – A hard, smooth surface such as metal or glass is highly reflective.  This means that the light hits more of the surface and bounces off.  This creates sharp, crisp edges and stronger contrasts of light and dark values.
  • Soft surfaces – A soft surface such as cloth or leaves absorb the light, creating smooth transitions between highlights and shadows.
  • Rough surfaces – If the surface is rough, the light hits less of the surface or hits it in less or sporadic areas.  The reflected light is less, making softer variances in values.  But the deeper the dips or crevices, the rougher the texture is.  Rough surfaces like tree bark, have many small ridges that catch the light on the high ridge with a dark shadow behind the ridge, creating stronger variances.
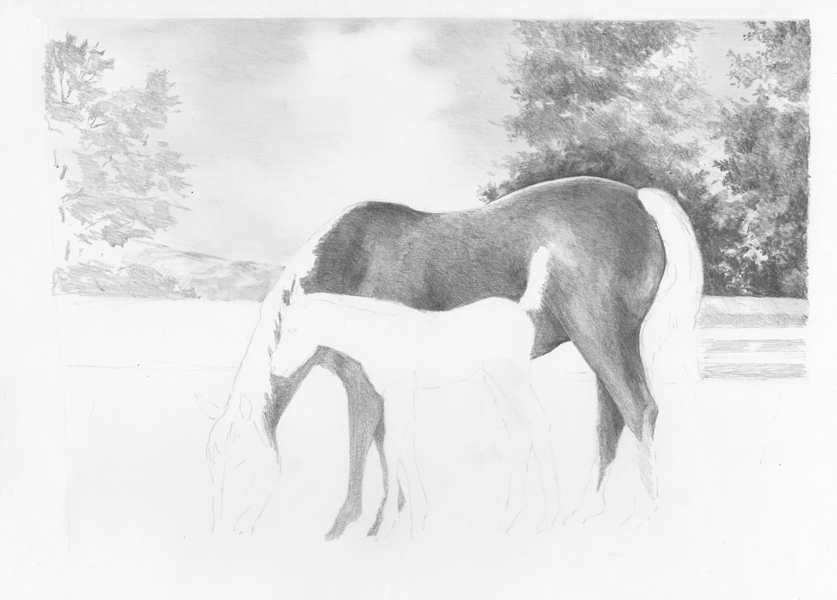
By using the pencil techniques described in Article Two and with a little practice, discovering how to draw textures can become one of the most favorite parts of drawing.  Here are some examples and steps on how to create common landscape object  textures.
Clouds and Skies – Clouds appear soft and cottony.  The sky behind is smooth.  There are three steps to create smooth skies with clouds.
a) Lightly crosshatch with an HB pencil.
b) Blend smooth with the chamois.
c) Erase out the cloud formations with the white eraser


Grass and Weeds – Use a vertical up-down pencil stroke.  With heavier pressure, start at the base of the grass blade then lessen the pressure as you reach the tip of the blade. This creates a tapered line.  Work from the back to front, drawing the shadowed blades, leaving the blades in front lighter.


Water  Use a side-to-side rocking motion to create the impression of water.  The flattened diamond shapes capture the reflection of objects in the water.

Trees and foliage – To create the illusion of tree leaves, use the pencil mark of scribbling to create short, random marks.
The first layer identifies and shapes the leaf bundles.  Draw in the branches that are not hidden by leaves.
Then build additional layers, working from the darkest shadow areas to the lighter leaf areas.
With each layer, add more definition and texture to the leaf bundles.  Use the kneaded eraser to lift off highlights.


Weathered Wood – Draw in the details of the wood grain and knots with a 2B lead.
Then use the flat edge of a chisel point 2H pencil and burnish a smooth light value over the top.
Additional details can be added.
Use the kneaded eraser to lift off highlights.


Combining pencil techniques -  Using a combination of pencil strokes, you can create a texture-rich drawing.  Here is an example.  Small circular strokes were used to create the stonework.  Burnishing a layer over the wood grain details makes weathered wood.  The bell used smooth gradient shading with highlights lifted out with a kneaded eraser.

More Drawing Tips
  • Avoid drawing too light.  Find the darkest area and establish your blacks.  This allows you to use the full range of values from white to black.
  • Work right to left if a lefty, left to right if right-handed.
  • Work background to foreground; top to bottom.
  • Start on the most detailed (focal point) area.  All other areas can then be sketched with less detail.

Tuesday, February 26, 2013

Article Three - Light and Shadows


Drawing Lessons: Using Light and Shadows to Create 3-Dimensional Shapes

Repost from:  
What gives objects form and shape?  Light and the shadows it creates.  Since graphite creates only shades of gray, values are all we have to represent light and shadow.  They are also the most expressive and effective tools we have. In this entry to Pencils.com’s stable of drawing lessons, we’ll explore how we can use light and shadows to create 3-dimensional shapes.
There are 4 main components of light and shadow:
Highlights – where the strongest light hits the surface of the object
Mid-tones – where light is indirectly hitting the surface
Reflected light – light bounces back onto the object
Shadows – core shadows are the darkest and strongest, cast shadows are various values depending on how strong the light is.

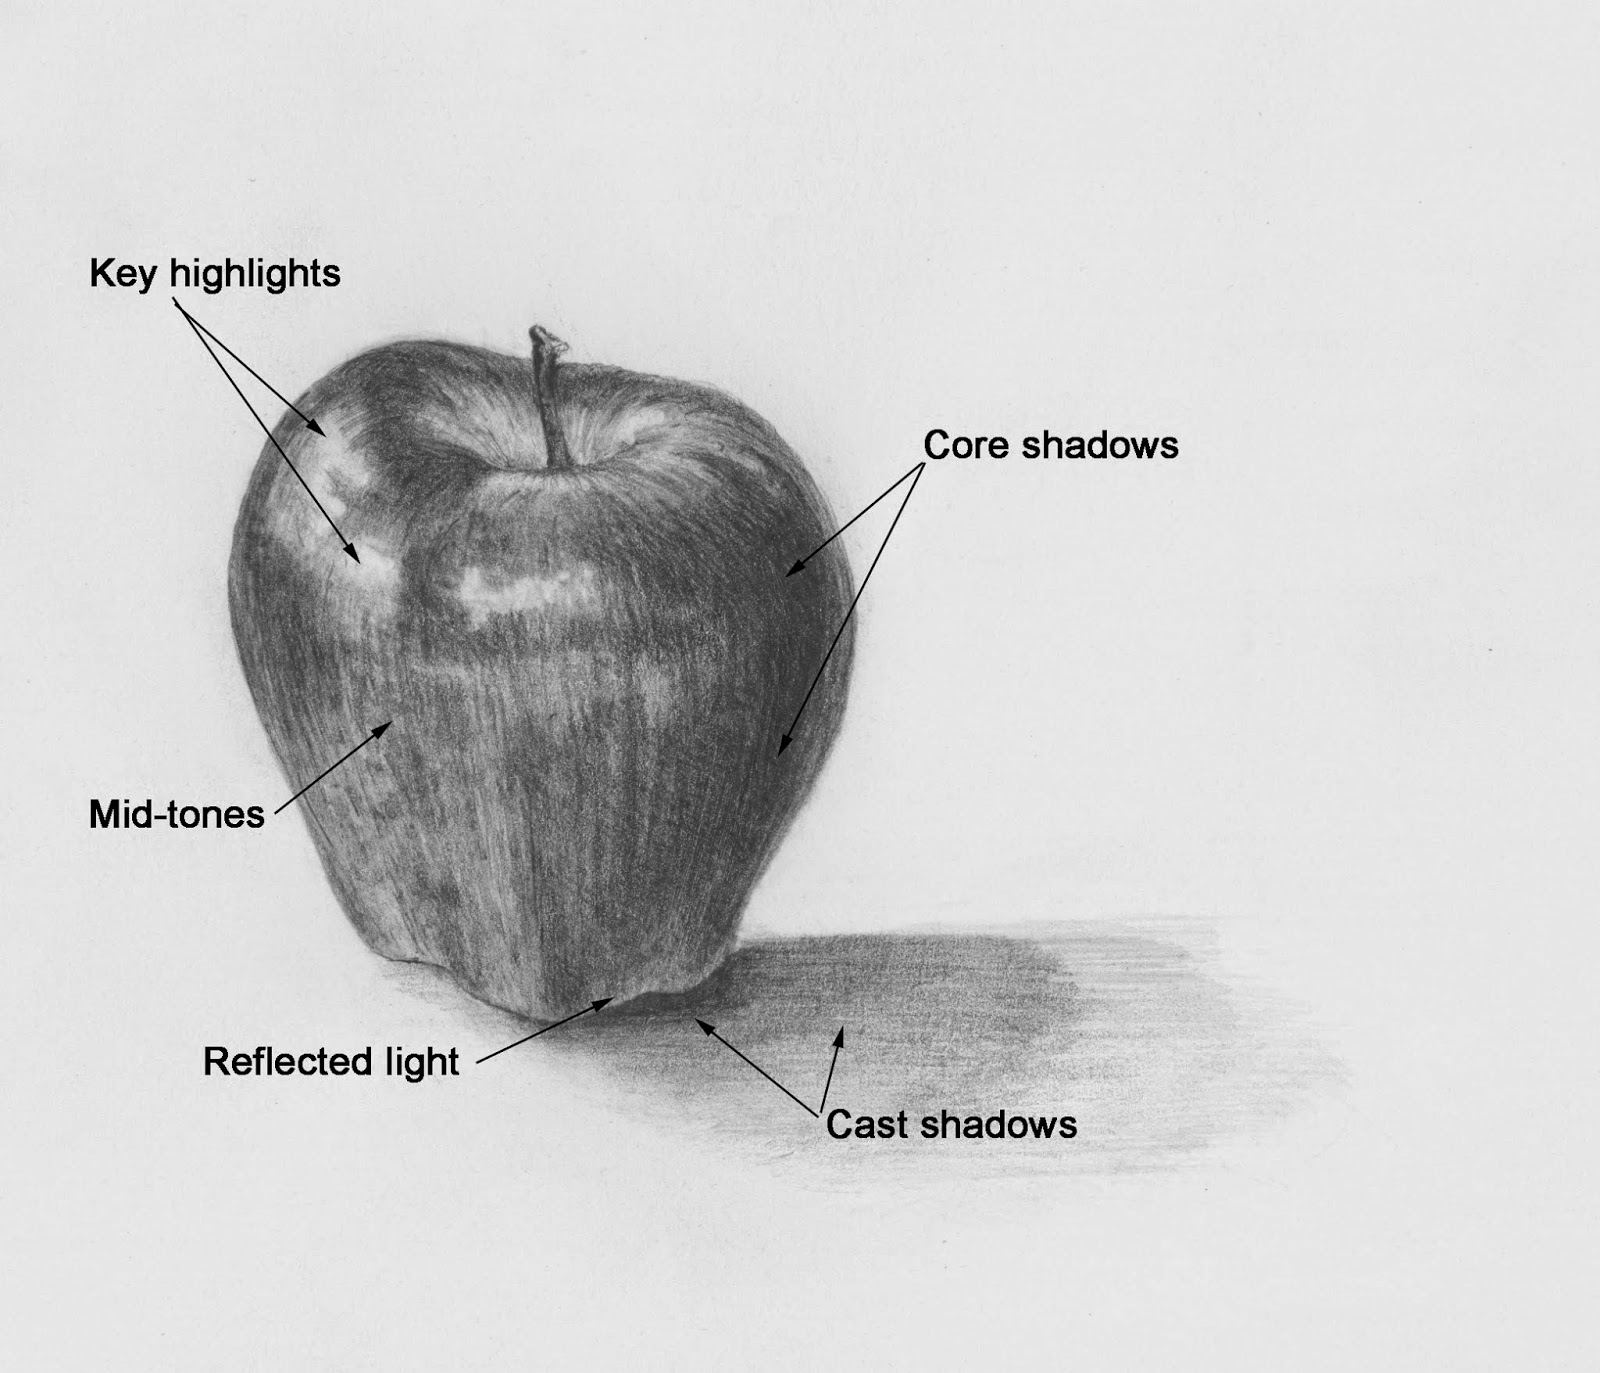
We know this is a red delicious apple because of its naturally dark mid-tones and shape.  We can almost “see” that is it red because colors correspond to specific gray values.  Imagine drawing a green granny smith apple and consider how you would draw it differently with lighter values and a rounder shape.
Good Drawing Practices
  • Avoid drawing too light.  Find the darkest area and establish your blacks.  This allows you to use the full range of values from white to black.
  • Work right to left if a lefty, left to right if right-handed.
  • Work background to foreground; top to bottom.
  • Start on the most detailed (focal point) area.  All other areas can then be sketched with less detail.
  • Understand what you are sketching before you put down that mark.  Being timid will show in your work, so be confident in your pencil mark.
  • Avoid overworking your sketch. Fresh, spontaneous pencil mark will create energy and keep your work alive.
  • The 3 P’s – Patience. Practice. Perseverance.  Be patient with yourself.  Practice, practice and practice some more.  Your perseverance will be rewarded! Happy Sketching!

Saturday, February 23, 2013

Werner Barn - Commission


Commissions offer a unique opportunity to collaborate the ideas of one individual with the visual artistic skills of another.  I really enjoy listening to the thoughts, ideas and stories from clients and then incorporating them into a piece of artwork that they had a "hand in" creating.  My goal is to bring their story to life on paper. 

I had the opportunity to do a very special commission for a former classmate, Dave Werner.  Dave and I have known each other since 2nd grade and got to catch up on our lives during our 35th high school class reunion this past summer.  Dave's parents were moving from their family farm and Dave thought a drawing of the homestead barn would be a great way for them to remember their life on the farm.  This drawing was a gift to his parents for Christmas.  I can't think of anything more special than a gift of art honoring his parents life-long efforts.

This barn has been well taken care of and represents the sense of pride family farmers have of their farms.  The quilt block on the face of the barn is a common decoration in the mid-west rural landscape.  The beautiful row of flowers and the white fence offer a rich texture to this simple composition.


Royal & Langnickel Kits


I have been working with the company, Royal & Langnickel over the past few years on a variety of art projects.  There are numerous blog posts showing artwork created for drawing and sketching kits.  They have given me the opportunity to explore a wide variety of subject matter and mediums.  I am always impressed with the beautifully designed products and look forward to more projects in the future.


I'm excited about the two newest kits created with my artwork.  These are "hot off the press" and I haven't seen them yet in stores.  Product Numbers are:  AME-110 for the Sketching Zoo Animals and AME-101 for the Drawing Colored Pencil Birds.

Friday, February 15, 2013

Horse & Colt


4/7/13 Update:  After setting this aside to work on a few other projects, I finally completed this drawing. 

Enjoy


2/15/13 Update:  Continuing to create definition in the background tree on the left.  Adding shadows from the  trees on the fence on the right.  Horse facial features added and the colt is starting to take shape.  Understanding the horses muscular under-structure helps to develop and define their three-dimensional form.


Here is a work in progress of a horse and colt.  This one is a bit larger than I have done in a while 
12 x16 on Canson Foundation series Bristol Board Smooth paper.  

After roughly sketching in the horse, colt and background placement, I lightly shade in the sky.  After the light layer has been applied, I use a chamois to smooth the graphite.  I leave white areas for clouds and still need to build up a some form to them as I continue to work on the trees.  The trees are in various stages of completeness.  The one on the far right is the most developed with varying shading to depict the bundles of leaves.  The far left one is the first layer roughly laid down identifying the general shape and placement.
  
The horse is shaded an overall medium value and then darker areas are layered in to build up the three dimensional form.  


This drawing is a project for a Royal Brush drawing kit.  It is fun to see my work incorporated into a variety of art sets sold in large box stores such as Michael's and Hobby Lobby.

Enjoy!

Diane