Saturday, December 01, 2007

Nature Study

I think I am finished with this study.....


I've finished the tree (although I think I need to do some more shading for depth on top.). I starting to work on the small path between the rocks. I've blocked in the rest of the rocks on the left as well.


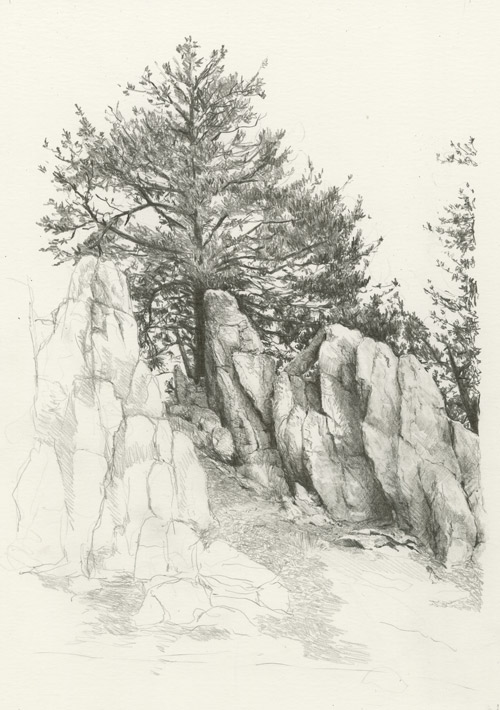
I'm progressing on the pine tree in the background. It is more of a silhouette than much detail. I should have toned the sky before I started. This would have allowed the highlights in the rocks stand out more. I'll call this one a nature study as I really am just experimenting with textures and shadowing.


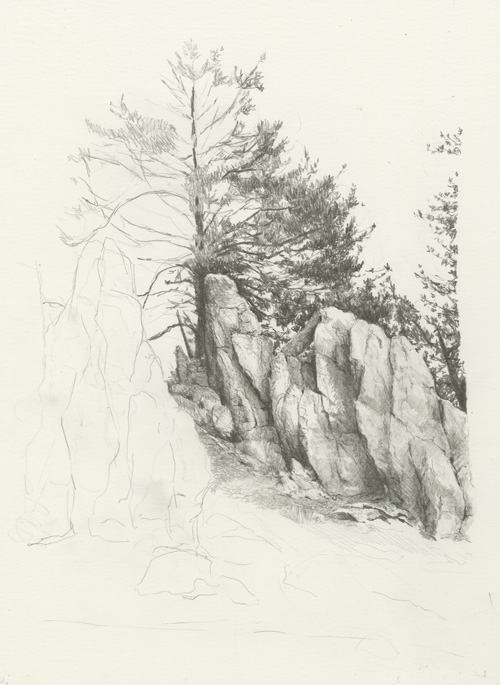
This is the first WIP. I am still experimenting with trying to capture the rocks. Between the fluid cracks and the subtle shadows and textures, they are a real challenge to do.

This fall we had a wonderful opportunity to visit our son in Tehachapi, CA. He recently moved out there to work at Scaled Composites in Mohave. We spent one day in a delightful trip to the Sequoia National Park. Taking a narrow, mountain road we reached the top at 8,000 feet elevation. This was one of the peaks. I was thrilled to get a number of great photos of rocks and trees.


Sunday, October 07, 2007

Jawbone Series

Two hours after finishing & posting the deer....here is Mr Bob. This tortoise is 109 years old and lives at the ranger's station. I worked as quickly as possible, attempting to capture the textures and strong shadows.

I've just completed the third one in the series: a mule deer. Just look at the size of those ears!


Here's the second in the series: A little kangaroo rat.


While visiting our son, Matt, a few weeks ago, we stopped at the Tehachapi ranger station. Robin, the gal from the station, requested that I create some Death Valley critter notecards. It sounds fun to do and a chance to draw some unusual little creatures.

This is the first of a series that I will be creating. This is an antelope ground squirrel:

Saturday, September 29, 2007

Morning Coffee

Now onto the towel. The folds in the towels and the edging add interest to the bottom of the drawing. The highlights pull out the folds nicely.

Now onto the wallpaper. I have no intention of drawing the intriquit design of the wallpaper, however, just an impression of the design has been rendered. I have shaded the top corners to draw the attention right back to the coffepot and grinder.

I might make some minor changes yet, but I think I just might be done!


I have added the burlap sack and coffee beans. The intent of my drawings is not to include every detail of an object, but just to give an impression of it. This holds especially true to the sack and beans. I have only given the hint of threads in the sack and the beans are more texture and shade than individual beans.


I have been able to get a little bit done this week on the coffee pot. I am using Arches Watercolor Hot press paper which has a much softer feel than the usual paper I use (Strathmore Bristol Smooth). It also scans with a very creamy color. I have not changed the image to a grayscale. But will shortly.

Still lifes really provide an excellent opportunity to explore different textures and the how light plays on different types of surfaces.


I've been contemplating a still life using a coffee grinder for quite some time. Finally have found the right ingredients. I just picked up the coffee pot today, borrowed the coffee grinder from my best friend, Char, and made the burlap sack and filled it with Starbucks expresso beans. Found some material that looks like old fashioned wallpaper of the 1890's. I think I'm ready to start. Now I just need to decide what kind of lighting to use......


Sunday, September 09, 2007

Haceta Light House - Oregon

"Joseph01" from ArtPapa.com shared a photo of a beautiful lighthouse with me. It is called the Haceta Light House by Florence, Oregon. THANKS JOE!

I started this drawing as a drawing demonstration at the local art store. They were having a grand reopening this weekend (Sept 7-8) and asked me to participate with a book signing and conduct drawing demos. I had a great weekend meeting a lot of nice folks! And even sold a few books!


Saturday, August 18, 2007

Old Weathered Barn

I have continued to work on the grass and the left side. I think I need to add a worn path the barn door on the left as well as develop the tractor road in the foreground more.....


It's coming along nicely. I have just a bit of the grass and the background trees to complete and it is almost done!


I have been very busy at work, so my progress on this drawing has been very slow. But it is progressing well.... I blended the sky with a very light tone. This allows the whites on the silo to be the whitest part of the paper..... I am adding a tractor path to the barn and opened the doors. A few minor changes to enhance the overall composition.


Mike Mac was gracious enough to allow me to use his photo for this scene. The original photograph can be found on his Ohio Barns website:

http://www.ohiobarns.com/miscpages/weatheredbarn/wb13.html


This big beautiful barn has so much character with the ivy growing on the barn as well as the decorative louvered windows. This one just called out to me to draw.


Saturday, July 21, 2007

Adam & Andrea

I think it's done! I have lowered Adams bangs and defined the area on the right side of his face.


Here is a big jump from the last scan to this one. I didn't want to stop and scan! There might be some minor tweaking to do but I do believe it's almost done!


Adam's face is very angular. It makes it much easier to get shadows and placement! I will be softening them up yet. But it's coming along.


Okay, with the help of my son, (he has an excellent critical eye) I am attempting to get Andrea look a bit younger and more of a likeness....


I continue to bring 3-dimensionality and form to Andrea's face. I am going to move over and start on Adam's features as I want to build both faces tonal features as consistently as possible.


I start by creating a very light outline of the facial features of both Adam and Andrea. This is used as a guideline for placement and positioning of the features. I start with a 2B .5mm mechanical pencil and create the eyes. I use the 2B lead to shape and shade the form of her face. Using a chamois I smooth out the graphite and then lift out the highlights with a kneutgummi eraser. This eraser is much softer that the Blu-tack that I typically use. It lifts the graphite much easier and works well for this feature.


This is Adam and Andrea.


Saturday, July 07, 2007

Tiger Lilly

I think this is completed! It is easy to overwork a subject like this, so I am going to stop before I lose the freshness. The background is left very rough and gives just the impression of stems and leaves.


I am working my way around the flower. I have to concentrate on making sure the pedals flow consistently and smoothly to the center of the flower. Not always easy to accomplish. I have had to make continual modifications of the white seam as well as the edges of the pedals to to keep the flow looking natural.....


I erase the white seam of each pedal with the white eraser. I then start working in the detail of each pedal using a F .5mm mechanical pencil. The subtle changes of values is important to create depth, while keeping the velvety texture. I work the background at the same time as I draw the pedal. I will be keeping the background blurred and indistinct.


It might seem odd to draw a flower in graphite. The brilliance of color to represent the subject matter is tempting. I feel flowers are an excellent subject matter to explore in graphite. The soft gentle pedals against a textured and abstracted background lends itself well to contrasting textures, light and shadows and the whole gambit of drawing exploration.

Flowers can be treated as studies, still lifes, or incorporated into landscapes. The possibilities are as endless as the varieties themselves.

To create the soft look of the pedals, I use the same technique as I use for skies. I cross-hatch the pedal using HB lead, then chamois the area smooth. I erase the over-smear to a crisp edge using a white plastic eraser.


Tuesday, May 29, 2007

Red Rock Canyon

I have been requested to post some detail shots of the tree.
So here are a couple of close-ups:


I'm not sure how much farther to work this drawing. I have a feeling I am finished, but I will let it sit for a few days and see if anything calls out for more detail. ENJOY!


I've worked some more on the background mountain range. It's tempting to put more detail in but it really needs to remain fairly non-distinct. The branches on the ground are also slowly taking shape as well.


I am working the background in before I get to the edges of the tree branches. I want to make sure the background is going 'behind' the tree. You can see the background bushes increasing in size adding depth to the scene. I have also sketched in the branches laying on the ground. This tree is so hardy...even the broken branches are still green with needles.


I am starting to lay in the background. Using a 4H chisel point clutch pencil, I start layering the desert ground. With a F .5 mm mechanical pencil I start to draw the small bramble bushes in the background. I have darkened the branches in the the shaded areas and it seems to be helping to bring life to this unique tree.


I am ever so slowing making my way through the tree. This is very time consuming as there is so much rich detail I don't want to miss! I have been working on this drawing off and on since January. But in the last 3 days I've made a bit of progress......


Last fall my husband and I vacationed in Las Vegas. While Vegas didn't hold much interest for me with all it's neon lights and gambling, we spent a couple of days outside of town. Red Rock Canyon is just 15 minutes west of Vegas and is truly a beautiful wonder to behold. This cedar tree is not very tall - perhaps 10 -15 feet, but what a rustic character it is!! I start the drawing by lightly cross-hatching a layer of graphite using 2H down for the sky. I then chamois this smooth. Using a white eraser I lift out just a hint of clouds. I start the tree's needles at the tip and am concentrating on the dark sections. I am using negative drawing to 'draw' around the trunk areas, leaving them white.


Sunday, April 29, 2007

Tennessee Barn - Continued

It' s been a while since I've had the opportunity to work on this one. I think I am done with it but the grass may need just a touch more...


Wednesday, April 11, 2007

Hawthorne Tree Study

This is a Hawthorne tree that resides in North Yorkshire England. My good friend, Mike Sibley, was so kind to take photos of some local trees for me. It is a small tree but has so much character with it's old knarly bark and knots and distinct leaves with small red berries.

This was drawn on Arches Watercolor paper, hot press. Size is approximately 9x12".


Saturday, March 03, 2007

Barn Commission

I believe this one is ready for a signature. I have laid in the grass and the lane gently curves into the picture...leading the viewer right into the scene. The tree shadow blanketing across the lane adds interest as well.


This is coming along nicely. I have the fence lines in and the driveway is starting to take shape. The grass is slowly taking form as well. The foreground tree on the left wraps the scene nicely together.


I've got the garden planted! This sure brings back memories of all those garden fresh vegetables...cabbage, carrots, beans, tomatoes and corn. I've started on the fence work and the lane as well....


I've drawn in the silo. It has a metal dome with lots of sun reflection. The silo itself is a brick one. Consistent with my approach, I do not draw every single brick. Instead I draw just enough to give the impression of bricks. I am careful to indicate a curve to give the silo a cylindrical shape. I continue with the trees in the background and the shed to the left of the building.

There is a maze of fences to decifer in the front part of the barn. I will have to look closely at the photo reference to see where they go.....


The barn is next... I have added just a few wispy clouds in the sky. Just enough to add interest, not enough to compete with the rest of the scene.


Since I am left-handed I work from right to left. For me that is a natural progression. It might seem a bit backwards to most people. I have decided to include just a few of the round hay bales but they disappear into the trees on the right. The background tree line and field are added as well.


I start by creating an outline of the barn and surrounding elements. I then create a smooth, toned sky.....


The size of this image 17.5 x 10".


I enjoy doing commissions for people. But when the subject matter includes a old family farmstead, it is even more enjoyable. This one is no exception!

My client provided me with a couple of photos of a barn. She is giving this drawing to her mother for her 75th birthday. What a beautiful barn and a wonderful gift....

Here are the two reference photos that I am working from. The panoramic is of the barn just before it was torn down. The black and white is how they all remember it looking like. I will be combining elements from both images to create an image from the past.....