Thursday, April 23, 2009
Drawing - Structures and Buildings
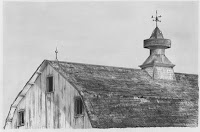
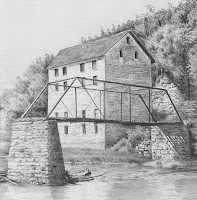
Buildings can create interest and diversity to a landscape. It can be the focal point or it can be a supporting actor. It can create a scene that tells a story, it can help put people or animals into perspective or create a backdrop for the scene. Buildings are one of the easiest ways to identify geographical regions. From urban skylines to country cottages, fishing shacks to barns, mines, mills, churches and historical architectural wonders - they are an endless resource for the artist.
COMPOSITION CONSIDERATIONS.
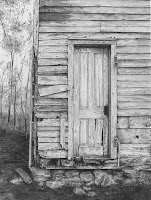
How much of the building do you want to include? Perhaps it's just a window, a door, or a corner of a building is used to create an interesting composition.
A part of the structure or the entire building may be drawn. But even if the building is the focal point, the surrounding landscape is just as important. It should complement and embrace the building.
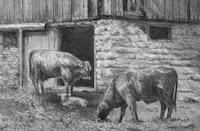
Be sure objects are of the proper proportion. Checking the size of windows and doors to match the height of people, animals or other objects is important.
How to lead the eye through the scene? A road or a path can lead
and control the viewer's direction into the scene. The sway of the grass or a branch can also
PERSPECTIVE
Drawing realistic buildings requires an understanding of perspective. If perspective rules are ignored, you will find the building will not 'sit' in the scene correctly. My book "Drawing Made Easy:Beautiful Landscapes" briefly touches on the subject. Two other good books include: Perspective (Artist's Library series #13) by William F Powell and Drawing Scenery: Landscapes, Seascapes and Buildings (The Art of Drawing) by Giovanni Civardi
Using perspective is fundamental to making a building structure look correct, but it should not dominate the artwork. Diligently drawing straight lines to perfect perspective sucks the life right out of the piece and the artwork will start to resemble illustration or architectural drawings. My preference is to use a t-square to confirm or correct my sketched outline. I will then deliberately freehand over a ruler line to breathe life back into the edge.
Perspective is used to create a sense of depth for the buildings, but paying attention to placement of objects, overlapping of objects and aerial or atmospheric perspective also have key roles in the success of the scene.
Consistent light source. Identify the direction of the sun and create the shadow angles consistently. This will create a solid 3-dimensional structure. Try doing thumbnail sketches to change the light source direction from early morning, to noon to late afternoon. Changing the direction of the shadows may create an entirely different mood or feeling to the scene. It can also help you understand the value composition
NEW v. OLD BUILDINGS
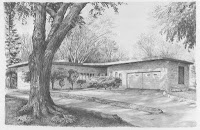
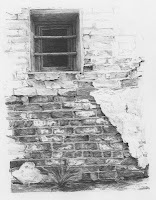
New buildings - The window frames and angles need to be sharp and crisp. On an older building these can be relaxed slightly, but they are still critical to the success of the building. On old buildings, perspective still applies. Unless the building has an intentional lean or ready to fall down, the vertical lines are still vertical and the side angles still converge to a vanishing point.
TEXTURES
This is where the fun begins. Bricks, stonework, shingles, window trimmings and old wood are just a few of the wonderful textures to explore when drawing buildings. I don't attempt to draw every brick or every stone in a building so I am always experimenting with pencil strokes to find just the right pattern to 'represent' the texture.
Saturday, April 04, 2009
Creating High Quality Prints
I am frequently asked questions about the process of creating high-quality prints of graphite artwork. Here is a series of Q&A from one such inquisitive artist and will hopefully take some of the mystery out of the print reproduction process.
Thank you so much for offering to help me.
You are most welcome. I am happy to help fellow graphite artists.
Disclaimer: In no way do I claim to have all the answers or even the best solutions but I am willing to share what I have learned through my own personal experience with creating prints.
I don't have a good scanner, so I usually take a picture.
This is great for computer usage, but as of yet, I have not been successful using anyone's digital camera image to create good prints. Since I don't charge much for my services, I can't afford to spend the time anymore, so that's why I require a scanned image.
The problem I see using a photograph is the image may lose those subtle grays. Even with a tripod, the camera's inherent nature is to create a unified image, thus losing the crispness and detail of each pencil stroke that a scan can pick up.
You mentioned that a person shouldn't send in an edited digital copy of a drawing. Is this because the monitor shows the drawing differently than a printer prints it?
Exactly, most images look better on the monitor when the contrasts are punched up. The printer doesn't need the contrast increased to that level. The more adjustments that are made, the more subtle grays are lost. Since I don't have the original drawing to compare to, I request the unedited and unadjusted images. I can't restore those grays once they are gone and some folks don't understand why their prints don't look like the original. My success rate on creating prints on the first attempt is over 95%. Occasionally I miss the mark and make them too dark or too light, but not very often.
When you print drawings, do you have to tweak them to make them come out right or are you able to just print them and they look great?
How much tweaking do I have to do? Not much.
Step 1: Scan the artwork at 300 dpi in color. Scanning at a higher resolution does not seem to increase the quality of the image. In fact, my scanner starts to pick up the texture of the paper if I go to a higher resolution.
Step 2: Open the image in Adobe Photoshop and zoom in on the image to visually look for any eraser residues, small flakes or blemishes and use the stamp tool to 'clean' these up.
Step 3: Then using the shortcut keys >CTRL< L to open the Balance histogram screen, I usually lower the white scale 3-5 points and increase the dark scale 3-5 points.
Step 4. Crop the image to the size you want and save the file in either .tif or .jpg format. Save the image in color.
Step 5: Use the printer's monochrome setting to create the monochrome prints.
When I take the picture I end up with the paper being gray rather than white.
I'm not a photography expert but I believe it's the white balance setting that needs to be adjusted. Scanning can produce a gray background as well. Try scanning at night to reduce the amount of shadowing that can occur. A Photoshop technique I've used on many artist images is to use the lasso tool, outline the image (such as a dog portrait), use the feather option at 30-50 and copy to a new layer. Then insert a solid fill layer that is white or off white depending on how much 'gray' is in the background. I can usually produce a print that has a "clean" background and is either white or 'less' gray. But there are times, when I have to retain the gray background as the alternative would be to lose the subtle grays.
I don't want to take my digital copy to any of the local printers, pay to get prints and find out they don't look like the original. How did you get into printing your own pencil art?
As other artists can contest, trying to get prints created from local printing shops is not easy. My experience was terrible. They had my original drawing for 3 weeks and after multiple phone calls, I finally picked up the print. The quality was so poor that it was unusable. And it was so expensive! $75 to scan the drawing, $75 setup and $75 for each print. At that moment, I was determined to create my own.
Do you know anything about lithography? How does it compare to what you do?
I don't know a lot about lithography other than the setup is expensive. Typically the production runs are 500-1000 to make them affordable. I don't know about you, but I can't store that volume or keep that kind of inventory! By creating my own prints, I don't have to keep any inventory and only print them as needed.
Lithography longevity ratings would depend upon the printer's materials used. Unless they specialize in artwork reproduction, they probably have no idea what their longevity ratings are.
The Epson archival ink is rated to last 92 years and the museum quality paper is rated to last 100 years. I produce high-quality prints that I don't hesitate to say will last between 25-50 years depending on the environment, lighting, framing etc. It is best quality that I create, I am confident in the materials and methods that I use, and ultimately that I am in control of the creation of my artwork from start to finish.
What kind of ink do you use to make them last a long time? What is Archival ink?
Here is a quote from the Epson website: Permanence, or how long a displayed print will last before noticeable fading, is where third party ink cartridges really pale in comparison to Epson ink cartridges. In a recent study, Henry Wilhelm, a leading authority on photo longevity, projected Epson inks to last for up to 92 years, while third party inks printed on the same paper were projected to last no more than a year.
http://www.epson.com/cgi-bin/store/landing/genuineink.jsp
When comparing printers be aware that there is a difference between lightfast inks and archival inks.
Do you have any suggestions for questions I should ask at the print shops I go to?
Here is a list of questions to ask:
Do they have experience in creating artwork reproduction and specifically graphite artwork?
Do they have examples of their work?
What kind of ink do they use and what is the longevity rating?
What kind of paper options do they have? Do they use museum quality paper? What kind of texture is the paper? Glossy or textured. Can you see a sample of the paper?
What is their guarantee? If the reproduction is not satisfactory, do you have to pay or will they work with you until it is?
What is their minimum number of prints required before a discount is given? 10,25, 50, 100, 500?
How large of artwork can they scan? Will you receive the scanned image on cd in a .tif or .jpg format? (I got my image in a format that would only work with their software...that was really useful!)
I'd like to learn about the printing process and what works well, so I can do my own, but I don't know where to start. I can't seem to find much info online.
It's not a difficult process as you can see from the steps listed above. Ultimately, it takes trial and error and experimentation to develop the steps that work best for you. Here are some on-line references:
www.epson.com
www.inkjetart.com
www.inkjetmall.com
Here is what you need to make your own prints:
1. A computer that has a minimum of 2 gig of ram. Scanning images can produce large files. A photo editing software is needed such as Adobe Photoshop Elements. A free editing software called GIMP (GNU Image Manipulation Program) is available for Windows, Max and Unix systems. http://www.gimp.org/
2. Purchasing a good scanner is not a huge investment. Any of the Epson scanners are excellent quality and run about $150. Most flat bed scanners are only 8.5x12. The expertise comes in learning to Photoshop to 'stitch' scans together. Rich Adams has a great instructional tutorial on this topic over in the Artpapa zoo forum. http://www.artpapa.com/forums/showthread.php?t=18781
3. Recommended archival ink printers: Epson 2400 or Epson 4800
The only difference between the two printers is the size of paper it can handle. I have the Epson 4800 and use 17"x40' roll paper.
I use the Matte Black ink cartridge to create the graphite artwork prints. Since I do not use my Epson printer for creating glossy photos, I do not need to swap out the glossy and matte black cartridges.
4. Paper - Museum quality
I did a lot of experimenting with tons of paper samples. I am now exclusively using the Hahnemuehl Photo Rage one-sided paper, 188gsm. It is the most consistent and versatile paper that I have tried and produces beautiful prints.
http://www.inkjetart.com/cart/photo-single-sided-c-1_6_59_60_737.html
The smooth surface of Photo Rag can be used for many different applications. This quality – 100% cotton rag - is especially ideal for archival printing of black and white and color photographs.
Datasheet:
http://www.hahnemuehle.com/media/downloads/23/102_css19-photorag188-rev02.pdf
Spend some time on the www.inkjetart.com website. They have an incredible amount of information on printers, papers and inks and is one of the largest information resources available on-line.
After working and creating prints for artists, they asked enough questions and understood the process well enough that they purchased their own scanner/printer to make their own prints. I think that is great since it is by far the best way to stay in control of your creative process from start to finish. For other artists, they are more than happy to have me do the scanning/printing of their prints. And that is fine too.
Diane
Subscribe to:
Posts (Atom)